

Photoshop. It's like a mountain to climb. You can chug up to the top, working hard, never letting up, or you can just go part way up and scoot around the side of the mountain and still get to the other side. Not everyone needs to be a Photoshop guru, or ninja pixel punisher. There are a few things to know and be comfortable with in order to do lots of cool things. Here are some tips that will take you a little way up the mountain, somewhat in order of altitude.
- Never save your work as a jpeg. Every time you reopen the image and do something new to it, Photoshop will throw some pixels away. Always save a file as a .tiff or a .psd.
- Open a picture from your computer or from a camera CF or SD card (File>Open and then locate a picture and click on the name.)
- Before you work on a file, make a copy of the background layer. You can do this by clicking on and dragging the layer to the Create New Layer icon, to the left of the garbage can icon at the bottom of the Layers palette. Let's go back a little bit…
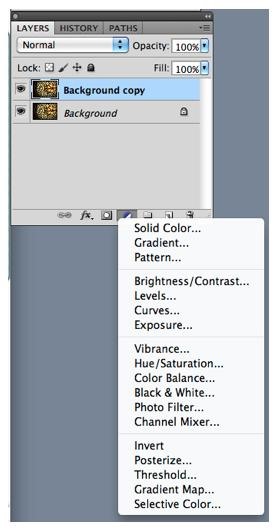
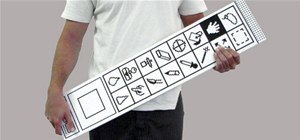
- On the right of the image is what is called the Layers palette. Here are the symbols at the bottom:
![]()
Some of these icons are more useful to beginners than others. The garbage can is for layers you want to drag to the trash and get rid of. The icon to the left makes a duplicate of the layer you drag into it. Or you can click on it to create a new empty layer.
The next one, which looks like a file folder, is to create a group. Never mind about that one until you master the rest. The one that looks like a circle that is half black, half white, is for making an adjustment layer; you click on it and get another menu. The choices that most people use are Brightness/Contrast, Curves and Levels. The square with a circle in the center is a Layer Mask option. The Layer Effects (fx) icon gives you another menu; the chain icon links layers. Never mind about those either, for the moment. Remember the Create New Layer icon (which looks like a stack of paper with one sheet folded up, I guess); the Create New Fill or Adjustment Layer (circle that is half black, half white) and the Layer Mask icon (square with circle in the center).
- You can use the menu on the top of the page to make adjustments directly to the image, or you can use the Adjustment Layer options to make the same adjustments, which will not only be alterable when you reopen the image, but you can actually re-adjust them. This is called non-destructive editing. No changes are made to the pixels.
- Non-destructive editing works for Curves, Brightness/Contrast, Levels, Hue/Saturation and more—pretty much all the Image>Adjustments options. Below are the almost identical options in the Image>Adjustments menu. The difference is that if you use the Image>Adjustments menu, on the top of the window, you will not be able to undo what you did, or change the intensity of your adjustment, once you save and close the image.
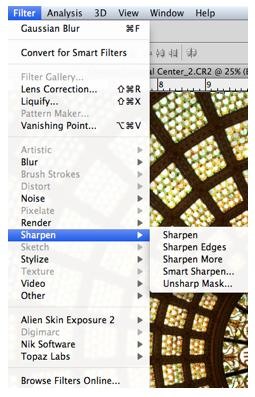
- Non-destructive editing is not an option for changes that can only be made directly to the image: Filters such as Unsharp Mask (sharpening), Liquify and Lens. Correction and tools such as Cloning and Healing.
There are a dozen ways to do any given adjustment in Photoshop. How do you know which is the right way? It's the one you remember! For example, here are five ways to increase contrast in an image. Each one takes the image to essentially the same place, but which one are you most comfortable with?
1) Add a curves adjustment layer and find the fly-out panel option, click on the drop down menu and select 'Increase Contrast.'

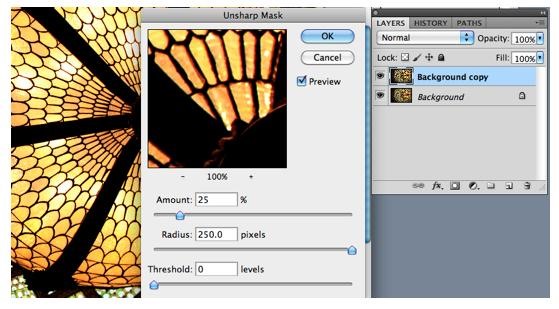
2) You could duplicate the layer and use the Unsharp Mask filter, inverting the usual conservative sharpening settings, to 15/250/0 for each of the sliders and then adjust the opacity of the duplicated layer to get the look you want.
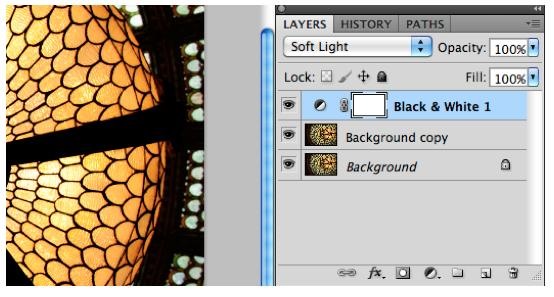
3) You could add a Black and White adjustment layer, set the layer style to Soft Light and adjust the opacity to get the look you want.
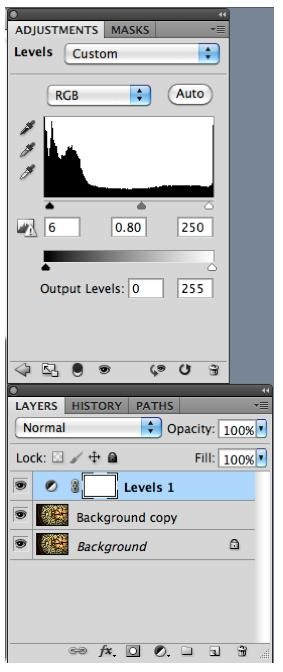
4) Add a Levels adjustment layer and bring the triangles in from either side until they just touch the bottom of the histogram graph; then, move the middle slider around to get the look you like.
5) Or, you could also just go to Image>Adjustments>Brightness and Contrast and move the sliders around to affect the image directly. The most important decision you have is whether you want to have the option of undoing what you did, or covering up some of it or scaling it back.
Now that you have an image open and ready to work on, there are a few things that might jump out at you. It might need sharpening. You might want to crop it to the ultimate print size or better yet, if you intend to share it on the web rather than print, you can crop it creatively to get rid of unimportant or distracting elements. You can fill in the shadows, or bring down the brightness using adjustment layers. When you are done, go to File>Save As and then pick a place to save the image and give it a name. Save it as a .psd file or .tif file, not as a .jpg.
More tips and tricks:
- Work on a duplicated layer or use an adjustment layer. Never work on the background image.
- If you open a file and try to use a tool or a filter and the one you want is grayed out in the menu options or won't open, it could be because many operations are not permitted on a background layer (the first layer—just double click on it to make it an active layer) or because you are working on a 16-bit file (just go to Image>Mode> and click on 8-Bits to convert).
- If you are combining layers to make a composite file to do creative stuff, size matters. The best resolution for printing is 240 or 300 ppi. If you drag a layer from one file that is 4x6 inches, at 300 ppi, onto a file that is 8x10 inches, at 300 ppi, you will be disappointed. Try to use images of similar size and resolution.
- You can resize a project using either Image>Image Size or Image>Canvas Size. There is a big difference, but it's pretty intuitive. Resizing larger with Image Size will damage the appearance of your file unless you are making a small enlargement. Resizing the document using Canvas Size gives you more space to move the layer around so you can add other layers or elements, without damaging the appearance of the image since you aren't really changing the size of the layer. This method is like having a giant canvas (hence the name), which is the background for moving around other pieces of your picture. It works best if your image is on a layer and the background layer underneath (which will be the canvas) is white. The easiest way to do this is to create a new document (File>New) and then drag the other layers onto that new document.
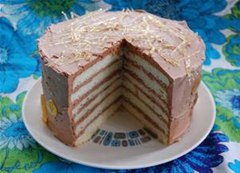 Now, for a comparison of Layers versus Adjustment Layers. I'm going to use a few different examples to illustrate how they work—there are as many ways to explain how Photoshop works as there are ways to do the same exact thing in Photoshop. I'm assuming we're all visual people and an illustration will help. Layers have content (an image, text, or even just a color or texture) and adjustment layers are non-destructive, content-free layers that impact the content of every layer below. Think of a torte cake. There might be three layers or fifteen. The more layers, the bigger the cake, or the file, will be. Unlike the cake, the layers work from the top down on a Photoshop file: the adjustment layers at the top (Curves, Brightness/Contrast, Hue/Saturation) impact all the layers below. If the cake were made of sponges, and you poured some paint on the top of the pile and then added more sponges to the top, the ones on top would not be impacted by the paint on the ones below. Content layers are sponges, adjustment layers are paint—but what's awesome about adjustment layers is that unlike real paint, you can just click the little eye symbol to the left of the layer and hide the impact of the paint, as if it isn't there at all.
- The layers with content kind of do the same thing. Imagine a stack of record albums, for instance. If you stand over it and look down, that is the same view you have of your image with layers. If you cut the top record in half (God forbid), you would see half of the album cover on the top record and half of the one underneath--but you know that album underneath the top one (which you cut in half) is the whole album cover, not a half album. The second album is masked by the first, but it's still there. That's how layers with content work. You can also click the little eye icon on the left of the layer to either reveal or hide the content layer.
- When should you make a duplicate layer before making changes to a layer with content? Any time you are making a change that cannot be undone once the file is saved. If you duplicate the layer, you can always hide it or mask off parts of the change you made. For example, if you want the eyes sharper than the skin surface (always a good thing), you might duplicate the layer, use a strong filter to sharpen, add a layer mask, fill it with black and use a white brush to reveal only the eyes. Now is a good point to move on to layer masks.
- Masking is a powerful tool. It is a way to hide part of a layer rather than deleting or erasing it. Using masks on layers can also be frustrating. Keep in mind the idea of a stack of record albums. Let's say you put that half of a record in the middle of the stack and start hiding pieces of the other records with layer masks and suddenly, you realize there is a little piece that you want to hide from the first record showing when you look down on the stack. Maybe it's from Dark Side of the Moon or some ELO album, and it changes the look of the whole damn stack. Now you have to take the whole stack apart to figure out which other album covers are arranged in what way that reveals that little piece. Ouch. Be careful when masking. Save a layered copy of your work or risk starting over when you find a mistake. Also, cutting or deleting parts of a layer does not work as well as using masks. You can undo a mask. Once you save a file, you cannot undo a deleted portion.
Just updated your iPhone? You'll find new emoji, enhanced security, podcast transcripts, Apple Cash virtual numbers, and other useful features. There are even new additions hidden within Safari. Find out what's new and changed on your iPhone with the iOS 17.4 update.

2 Comments
this was fun to check out, I learned a few things about saving work and editing portraits along the way.
Thanks!
Just wait! More portrait editing posts in the future!
Share Your Thoughts